ASCII.jp Operate Microsoft version of OpenSSH as a server
- 1424
- 98
ASCII.jp Operate Microsoft version of OpenSSH as a server
- By huaweicomputers
- 12/04/2022
This time, run the server with Microsoft version of OpenSSH. In addition, since it is assumed that the installation of OpenSSH and the path setting introduced last time have already been completed, please refer to the article and proceed with the path setting etc.
Note that even Windows 10 requires a local user name
There are a few things to keep in mind when installing a server. Since Windows 8, Microsoft accounts have been available for user accounts, but in the Microsoft version of OpenSSH, command arguments must use a user name, also known as an "internal user name," instead of a Microsoft account.
Specifically, the user name displayed when the whoami command is executed at the command prompt when logging on to Windows is the "internal user name".
In the case of workgroup operation, use the "internal user name" displayed by the whoami command instead of the Microsoft account as the user name.
To specify the login user with the ssh.exe command etc., it is necessary to use the "internal user name" of the user account on the server side. Simply, the folder name of the user's home folder (folder under C: \ Users) corresponds to the "internal user name".
For PCs upgraded from Windows 8 etc., Chinese characters may be used in the internal user name. In the Microsoft version of OpenSSH, internal user names in Chinese characters can also be used, but be careful when logging in with SSH from Linux.
Also, the internal user name does not have a one-to-one correspondence with the Microsoft account on all machines, so even with the same Microsoft account, the internal user name may be different for each machine. Therefore, be careful when logging on. Also, as will be described later, with SSH, public key authentication is possible without using a password at login, but at this time, the server side determines the user's home folder from the specified "internal user name" and determines the home folder. Authenticate with the file below.
In my environment, the internal user name for the same Microsoft account was different on the server side and the client side, and the internal user name was in Chinese characters on the server side. At this time, ssh.exe can log in (password authentication, public key authentication) using the internal user name in Chinese characters. However, Chinese character user names are cumbersome to operate on the command line.
So, I created a local account on the server side that is the same as the internal user name on the client side. You can still log in. However, since Windows on the server and the client are recognized as different users, care must be taken when operating remote files. Since this operation is possible, it will not be necessary to recreate the user account so that the internal user name is the same on the server and the client.
Use public key authentication
With SSH, it is possible to authenticate using public key cryptography instead of password authentication by the user when logging on. This is a method in which the public key is placed on the server side and the user is authenticated in combination with the private key on the client side. Even though it is encrypted, the password does not flow in the network, so it is more secure and password input. The advantage is the ease of use that you can log in without it.
Public key cryptography is an encryption method in which encryption is performed with a "private key" and decrypted with a "public key", and is called asymmetric cryptography. Being able to decrypt with the public key means that you have the private key, so you can authenticate that the other party is correct. Moreover, since it is impossible to infer the private key from the public key, there is no problem even if the public key itself is leaked.
Public key authentication uses this to authenticate the user (have the correct private key). All authentication operations are performed on the software side. However, this requires the private key to be stored securely.
Basically, the private key itself is encrypted and saved in a file, but the password given at this time is called a "passphrase" in OpenSSH. The reason why it is called so is that it is possible to use long sentences. Enter this passphrase during authentication to have OpenSSH use the private key temporarily.
When using multiple servers or opening multiple sessions, it is troublesome to enter the passphrase each time, so use software called ssh-agent to manage the private key in memory. This is convenient when using multiple sessions, but I will omit it in this explanation. There are many OpenSSH materials on the Internet for Linux, so please refer to them.
By the way, in this public key authentication, the RSA public key cryptosystem is generally used to create a private key and a public key, and save them in the ".ssh" folder under the user's home folder. In addition, it is necessary to properly control access to these files, such as making them inaccessible to others. In Windows, such access control is executed by ACL (Access Control List), and the icacls command is used from the command line, but it can be processed collectively by the PowerShell script attached to OpenSSH.
Complete the client settings before setting up the OpenSSH server
Here, before entering the server settings, complete the client-side settings first. Here, the client machine is PC1, the user's Microsoft account is "user001@example.com", and the internal user name is "user001". Please note that the host name, user name, path, etc. need to be rewritten according to your environment.
Sign in to Windows 10 and start PowerShell with administrator privileges. After starting, move to the C: \ OpenSSH folder and go to the C: \ OpenSSH folder.
cd c: \ openssh \
Execute the following command.
Execute the ssh-keygen command to create a private key and public key file for each user. You can leave the save destination folder at the default.After execution, start the PowerShell script attached to OpenSSH and change the permissions.
When using PowerShell, it is necessary to explicitly prefix ". \" In order to execute the command in the current directory.
. \ ssh-keygen -t rsa
At this time, the .ssh folder (c: \ users \ user001 \ .ssh) under the user's home folder should be specified as the save destination of the file. You can use it elsewhere, but it's a good idea to use the default value, as you may not remember it later. In addition, if Chinese characters are used in the internal user name, the display may be garbled, but unless there is an error, it seems that the correct folder is used.
Then ask for your passphrase. This is to encrypt the private key file, not the password used to log in. Enter the same passphrase twice to end the command. It is possible to specify an empty passphrase as the enter key only when asked for the passphrase, but please be aware that there is a risk of the private key being leaked.
If you look in the .ssh folder after running the command, you should see two files, "id_rsa" and "id_rsa.pub". Therefore, execute the following command (note that it is one line) to correct the access right of the file (in case of PowerShell, you can specify the file name with the full path).
Powershell -executionpolicy bypass -File C: \ openssh \ FixUserFilePermissions.ps1
If you see id_rsa and id_rsa.pub as a result, you should be fine.

OpenSSH server settings
For historical reasons, the OpenSSH server is named "sshd". In the server-side settings, the host name is assumed to be PC1, and the user who accepts login is the same as the client, "user001@example.com" (internal user name is user001). Suppose your work is done by signing in to Windows at user001@example.com. Also, on the server side, the installation folder is C: \ OpenSSH, and the path setting is completed.
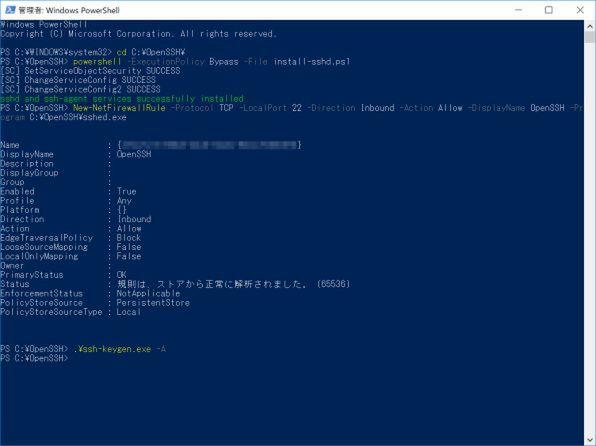
First, start PowerShell as an administrator and move it to the OpenSSH folder. Next, install the sshd server as a service with the following command.
In the server settings, register sshd.exe etc. as a service with the install script, add rules to the firewall, and generate a host authentication key.
powershell -ExecutionPolicy Bypass -File install-sshd.ps1
Next, execute the following command to set the firewall passage rule for sshd (note all 1 line, installation folder, etc.).
New-NetFirewallRule -Protocol TCP -LocalPort 22 -Direction Inbound -Action Allow -DisplayName OpenSSH -Program C: \ OpenSSH \ sshed.exe
Next, execute the following command to create an authentication key for the host.
. \ ssh-keygen.exe -A
Next, set the sshd service installed by the following command to be automatically executed when the PC starts (Control Panel Administrator Tools → Services can also be set using the GUI).
Set-Service sshd -StartupType Automatic
Edit the sshd_config file for public key authentication. Notepad can be used for editing (sshd.exe works even if the line end is CR-LF in S-JIS / ASCII format). After opening the file, search for the line "#PubkeyAuthentication yes", remove the "#" (meaning annotation) at the beginning of the line, and save the file. It is safer to copy the original line and rewrite it.
Edit the sshd_config file and set PubkeyAUthentication to yes
Next, create an .ssh folder under the home folder of the logged-on user and put the public key file, but to confirm that the user is correctly recognized, execute the ssh-keygen -t rsa command and execute the ssh-keygen -t rsa command. It is easiest to create an RSA encryption key on the server side and execute "FixUserFilePermissions.ps1" (see the client side settings above).
Next, add the contents of the public key file "id_rsa.pub" to the authorized_keys file in the .ssh folder. If the authorized_keys file does not exist, you can copy the id_rsa.pub file under .ssh and rename it (paths should match your environment).
● When the authorized_keys file does not exist (assuming the public key file is in C: \ temp) copy c: \ temp \ id_rsa.pub c: \ users \ user001 \ .ssh \ authorized_keys
If you already have a file, you can open it in an editor and paste it with Copy & Paste (note that Notepad may wrap itself in words). From PowerShell, do the following:
Add the public key file created by the client to authorized_keys in .ssh under the user folder
● When the authorized_keys file exists (assuming the public key file is in C: \ temp) get-content c: \ temp \ id_rsa.pub | add-content c: \ users \ user001 \ .ssh \ authorized_keys
After that, change the access right of the authorized_keys file with the following command.
Finally, run the included PowerShell script to set the permissions on the required files
C: \ OpenSSH \ FixHostFilePermissions.ps1 -Confirm: $ false
It checks the authorized_keys in each user's .ssh folder in addition to the host authentication key. Therefore, if you create a new authorized_keys, execute it again.
Finally restart the sshd service.
restart-service sshd
Now you can authenticate your public key with an OpenSSH connection from PC1 to PC2. If the public key is not set on the server side, password authentication will be performed.
Try to actually log in remotely
This allows the client to authenticate with public key cryptography. If you already have an SSH server, you can set the created public key file on the server side and log on with the following command. When using rsa public key authentication, use the following command in Microsoft version of OpenSSH.
ssh.exe -ic: \ users \ user001 \ .ssh \ id_rsa user001 @ PC2
Thus, after the "-i" option, write the full path to the private key file. Also, connect the login user name and login destination server name with "@", and specify as "user001 @ PC2".
In the case of so-called Windows domain operation (active directory), specify the user name as "user @ msdomain" and "msdomain \ user". At this time, "user @ msdomain @ host" and "msdomain \ user @ host", which are the methods for specifying the ssh user name and host name using "@", can also be used as they are. Because of this, the Microsoft version of OpenSSH does not allow you to specify a Microsoft account as a user name.
If the server settings are correct, you should be able to log in without asking for your password. When connecting to the server for the first time, you will be asked if you want to register the host authentication key of the server, so answer "yes".
The host authentication key of this server is recorded for each user, and the next and subsequent connections use the authentication key to check whether the other host is correct. This information is recorded in the known_hosts file in the .ssh folder under each user folder.
Password authentication is possible, but if public key authentication fails with "Permission denied", there is a possibility that the access right settings of the id_rsa local file and the authorized_keys file on the server side are incorrect. In that case, execute the PowerShell script file that starts with "Fix" that comes with Microsoft version of OpenSSh to correct the permissions.
ssh.exe displays the login status by adding the -v option, and there is a log file output by sshd in the OpenSSH \ logs folder of the server. Also, after changing the configuration file etc., it is necessary to restart sshd which is operating as a service.
What is ASCII Club?
Display format: PC ⁄ smartphone


